
This article discusses how to implement Google Analytics code in your Flash Projects. This is useful if you want to track progress of your Flash Application.
The first thing that you need to do is to create a Google Analytics account. While creating the account it will ask for Website URL and other details which you need to provide depicted in the below screenshot.


// import the analytics classes
import com.google.analytics.AnalyticsTracker;
import com.google.analytics.GATracker;
// Set the Tracker variables for each page
// Tracker Variables
// Main Page Tracker
var tracker:AnalyticsTracker = new GATracker(this, "UA-46607371-1", "AS3", false);
// Create Pivot Tracker
var trackerCreate:AnalyticsTracker = new GATracker(this, "UA-46607371-2", "AS3", false);
// Export Pivot Tracker
var trackerExport:AnalyticsTracker = new GATracker(this, "UA-46607371-3", "AS3", false);
// Schedule Pivot Tracker
var trackerSchedule:AnalyticsTracker = new GATracker(this, "UA-46607371-4", "AS3", false);
// End of Tracker Variables
The new GATracker() function is inbuilt into the component which we have just downloaded. The important thing here is the UA-46607371-1 tracking ID code. You should have got this code when you had clicked on get Tracking ID button. You can also get this code in your Google Analytics Account. Click on Admin. Under Property click on Tracking Info > Tracking Code. Each page will have a different Tracking Code. The Boolean false has been assigned to the function. To test it within flash you can change it to true. But before you publish it change it to false.
Now for the code in the buttons:
// Main Page Interactivity
this.laptop_mc.play_btn.addEventListener(MouseEvent.CLICK, play_btn_fn);
function play_btn_fn(e:MouseEvent):void
{
tracker.trackPageview("Main Page");
MovieClip(root).gotoAndPlay("page2");
}
// Create Pivot Interactivity
this.create_pivot.my_button.addEventListener(MouseEvent.CLICK, my_button_fn);
function my_button_fn(e:MouseEvent):void
{
trackerCreate.trackPageview("Create Pivot");
MovieClip(root).gotoAndPlay("link_1");
}
// Export Pivot Interactivity
this.export_pivot.my_button.addEventListener(MouseEvent.CLICK, my_button_fn_1);
function my_button_fn_1(e:MouseEvent):void
{
trackerExport.trackPageview("Export Pivot");
MovieClip(root).gotoAndPlay("video_2");
}
// Schedule Pivot Interactivity
schedule_pivot.my_button.addEventListener(MouseEvent.CLICK, my_button_fn_2);
function my_button_fn_2(e:MouseEvent):void
{
trackerSchedule.trackPageview("Schedule Pivot");
MovieClip(root).gotoAndPlay("video_3");
}
Here we focus on the statement
tracker.trackPageview("Main Page");
This code sends the info to the Google Analytics site on button click. The string “Main Page” can be changed as per our requirements.
You can also put the Analytics code in a Key frame instead of a button symbol. Just add it on an enterframe script as can be seen below:
// Process Flow Tracker
addEventListener(Event.ENTER_FRAME, onProcessFlowTracking);
function onProcessFlowTracking(evt:Event):void
{
trackerProcessFlow.trackPageview("Process Flow");
removeEventListener(Event.ENTER_FRAME, onProcessFlowTracking);
}
Now comes the JavaScript part. Add the Javascript code in your html page after publishing the Flash file. Since we have only one single flash file with four sections the code has to be added in just one html file. The Javascript code is the one which we saved in our txt files. It will also be available in your Google Analytics account. Below is the code for the same.
<script>
(function(i,s,o,g,r,a,m){i['GoogleAnalyticsObject']=r;i[r]=i[r]||function(){
(i[r].q=i[r].q||[]).push(arguments)},i[r].l=1*new Date();a=s.createElement(o),
m=s.getElementsByTagName(o)[0];a.async=1;a.src=g;m.parentNode.insertBefore(a,m)
})(window,document,'script','//www.google-analytics.com/analytics.js','ga');
ga('create', 'UA-46607371-1', 'tcsion.com');
ga('send', 'pageview');
</script>
<script>
(function(i,s,o,g,r,a,m){i['GoogleAnalyticsObject']=r;i[r]=i[r]||function(){
(i[r].q=i[r].q||[]).push(arguments)},i[r].l=1*new Date();a=s.createElement(o),
m=s.getElementsByTagName(o)[0];a.async=1;a.src=g;m.parentNode.insertBefore(a,m)
})(window,document,'script','//www.google-analytics.com/analytics.js','ga');
ga('create', 'UA-46607371-2', 'tcsion.com');
ga('send', 'pageview');
</script>
<script>
(function(i,s,o,g,r,a,m){i['GoogleAnalyticsObject']=r;i[r]=i[r]||function(){
(i[r].q=i[r].q||[]).push(arguments)},i[r].l=1*new Date();a=s.createElement(o),
m=s.getElementsByTagName(o)[0];a.async=1;a.src=g;m.parentNode.insertBefore(a,m)
})(window,document,'script','//www.google-analytics.com/analytics.js','ga');
ga('create', 'UA-46607371-3', 'tcsion.com');
ga('send', 'pageview');
</script>
<script>
(function(i,s,o,g,r,a,m){i['GoogleAnalyticsObject']=r;i[r]=i[r]||function(){
(i[r].q=i[r].q||[]).push(arguments)},i[r].l=1*new Date();a=s.createElement(o),
m=s.getElementsByTagName(o)[0];a.async=1;a.src=g;m.parentNode.insertBefore(a,m)
})(window,document,'script','//www.google-analytics.com/analytics.js','ga');
ga('create', 'UA-46607371-4', 'tcsion.com');
ga('send', 'pageview');
</script>
Note that the Google Analytics results would take some time to appear in your account. It usually takes 2-3 days to 1 week.
The first thing that you need to do is to create a Google Analytics account. While creating the account it will ask for Website URL and other details which you need to provide depicted in the below screenshot.
In a Flash Application or a Website there might be single or multiple pages. It is possible to track each page in a Flash Application. All you need to do is set an Account and Property for the same.
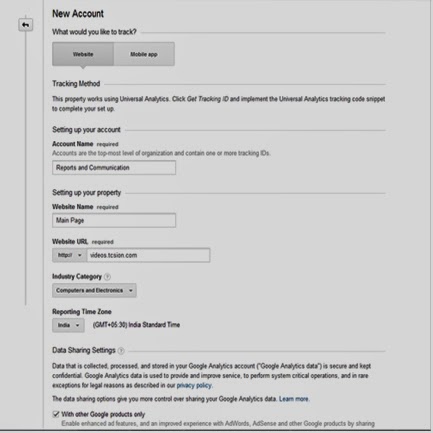
Say, for example, you have a Flash Website containing 4 Pages or Sections namely Main Page, Create Pivot Report, Schedule Pivot Report and Export Pivot Report. Create a new Account and name it as Reports and Communication as shown in the below screenshot. You will have to provide other details like your website url and property name. The Property name will be the name of your pages. In this case I have given it the name of first page i.e. Main Page. After filling all the details click Get Tracking ID option.
This will open up another Page with Tracking Code. This code is basically a JavaScript Code to track your Flash Page. You may choose to save this code in a txt file. This code will appear in your html file which embeds your Flash file.
We need to create 3 more properties for Create Pivot Report, Schedule Pivot Report and Export Pivot Report. We have already created one property for Main Page while creating a new Account. Click on create new Property option to create properties for Create Pivot Report, Schedule Pivot Report and Export Pivot Report. Follow the same steps as above to get the JavaScript code. All these options are available in the Admin section of Google Analytics.
For using Google Analytics Tracking feature in Flash we need to download the Analytics components. You can download these files from the below link:
It would also help if you would read the below articles which explains Google Analytics Tracking particularly for Flash files.
Now we need to add the Google Analytics code in our Flash file. I have used a single Flash file which contains four keyframes for Main Page, Create Pivot Report, Schedule Pivot Report and Export Pivot Report. The Page will get tracked as soon as the user reaches these keyframes.
Once you have installed the Analytics components it will appear in your Windows > Components Panel. You will be able to see 2 components namely Analytics and Analytics Library.
Drag both the components on the stage and delete it. It will be available in your movie’s library.
Now let’s explore the code for the same. We have four buttons in our movie. On clicking these buttons it opens each page namely Main Page, Create Pivot Report, Schedule Pivot Report and Export Pivot Report.
First import the Analytics Classes
// import the analytics classes
import com.google.analytics.AnalyticsTracker;
import com.google.analytics.GATracker;
// Set the Tracker variables for each page
// Tracker Variables
// Main Page Tracker
var tracker:AnalyticsTracker = new GATracker(this, "UA-46607371-1", "AS3", false);
// Create Pivot Tracker
var trackerCreate:AnalyticsTracker = new GATracker(this, "UA-46607371-2", "AS3", false);
// Export Pivot Tracker
var trackerExport:AnalyticsTracker = new GATracker(this, "UA-46607371-3", "AS3", false);
// Schedule Pivot Tracker
var trackerSchedule:AnalyticsTracker = new GATracker(this, "UA-46607371-4", "AS3", false);
// End of Tracker Variables
The new GATracker() function is inbuilt into the component which we have just downloaded. The important thing here is the UA-46607371-1 tracking ID code. You should have got this code when you had clicked on get Tracking ID button. You can also get this code in your Google Analytics Account. Click on Admin. Under Property click on Tracking Info > Tracking Code. Each page will have a different Tracking Code. The Boolean false has been assigned to the function. To test it within flash you can change it to true. But before you publish it change it to false.
Now for the code in the buttons:
// Main Page Interactivity
this.laptop_mc.play_btn.addEventListener(MouseEvent.CLICK, play_btn_fn);
function play_btn_fn(e:MouseEvent):void
{
tracker.trackPageview("Main Page");
MovieClip(root).gotoAndPlay("page2");
}
// Create Pivot Interactivity
this.create_pivot.my_button.addEventListener(MouseEvent.CLICK, my_button_fn);
function my_button_fn(e:MouseEvent):void
{
trackerCreate.trackPageview("Create Pivot");
MovieClip(root).gotoAndPlay("link_1");
}
// Export Pivot Interactivity
this.export_pivot.my_button.addEventListener(MouseEvent.CLICK, my_button_fn_1);
function my_button_fn_1(e:MouseEvent):void
{
trackerExport.trackPageview("Export Pivot");
MovieClip(root).gotoAndPlay("video_2");
}
// Schedule Pivot Interactivity
schedule_pivot.my_button.addEventListener(MouseEvent.CLICK, my_button_fn_2);
function my_button_fn_2(e:MouseEvent):void
{
trackerSchedule.trackPageview("Schedule Pivot");
MovieClip(root).gotoAndPlay("video_3");
}
Here we focus on the statement
tracker.trackPageview("Main Page");
This code sends the info to the Google Analytics site on button click. The string “Main Page” can be changed as per our requirements.
You can also put the Analytics code in a Key frame instead of a button symbol. Just add it on an enterframe script as can be seen below:
// Process Flow Tracker
addEventListener(Event.ENTER_FRAME, onProcessFlowTracking);
function onProcessFlowTracking(evt:Event):void
{
trackerProcessFlow.trackPageview("Process Flow");
removeEventListener(Event.ENTER_FRAME, onProcessFlowTracking);
}
Now comes the JavaScript part. Add the Javascript code in your html page after publishing the Flash file. Since we have only one single flash file with four sections the code has to be added in just one html file. The Javascript code is the one which we saved in our txt files. It will also be available in your Google Analytics account. Below is the code for the same.
<script>
(function(i,s,o,g,r,a,m){i['GoogleAnalyticsObject']=r;i[r]=i[r]||function(){
(i[r].q=i[r].q||[]).push(arguments)},i[r].l=1*new Date();a=s.createElement(o),
m=s.getElementsByTagName(o)[0];a.async=1;a.src=g;m.parentNode.insertBefore(a,m)
})(window,document,'script','//www.google-analytics.com/analytics.js','ga');
ga('create', 'UA-46607371-1', 'tcsion.com');
ga('send', 'pageview');
</script>
<script>
(function(i,s,o,g,r,a,m){i['GoogleAnalyticsObject']=r;i[r]=i[r]||function(){
(i[r].q=i[r].q||[]).push(arguments)},i[r].l=1*new Date();a=s.createElement(o),
m=s.getElementsByTagName(o)[0];a.async=1;a.src=g;m.parentNode.insertBefore(a,m)
})(window,document,'script','//www.google-analytics.com/analytics.js','ga');
ga('create', 'UA-46607371-2', 'tcsion.com');
ga('send', 'pageview');
</script>
<script>
(function(i,s,o,g,r,a,m){i['GoogleAnalyticsObject']=r;i[r]=i[r]||function(){
(i[r].q=i[r].q||[]).push(arguments)},i[r].l=1*new Date();a=s.createElement(o),
m=s.getElementsByTagName(o)[0];a.async=1;a.src=g;m.parentNode.insertBefore(a,m)
})(window,document,'script','//www.google-analytics.com/analytics.js','ga');
ga('create', 'UA-46607371-3', 'tcsion.com');
ga('send', 'pageview');
</script>
<script>
(function(i,s,o,g,r,a,m){i['GoogleAnalyticsObject']=r;i[r]=i[r]||function(){
(i[r].q=i[r].q||[]).push(arguments)},i[r].l=1*new Date();a=s.createElement(o),
m=s.getElementsByTagName(o)[0];a.async=1;a.src=g;m.parentNode.insertBefore(a,m)
})(window,document,'script','//www.google-analytics.com/analytics.js','ga');
ga('create', 'UA-46607371-4', 'tcsion.com');
ga('send', 'pageview');
</script>
Note that the Google Analytics results would take some time to appear in your account. It usually takes 2-3 days to 1 week.
No comments:
Post a Comment